Giới thiệu
Bài viết này giới thiệu phương pháp đánh giá vẻ đẹp khuôn mặt bằng cách sử dụng mô hình học sâu trong lĩnh vực trí tuệ nhân tạo.
Dữ liệu
Dữ liệu sử dụng để huấn luyện là bộ SCUT-FBP5500. Bộ dữ liệu có tổng số 5500 khuôn mặt trực diện bao gồm 4 tập con với các chủng tộc và giới tính khác nhau, bao gồm 2000 ảnh khuôn mặt phụ nữ Châu Á (AF), 2000 ảnh khuôn mặt đàn ông Châu Á (AM), 750 khuôn mặt phụ nữ da trắng, 750 khuôn mặt đàn ông da trắng (CM).
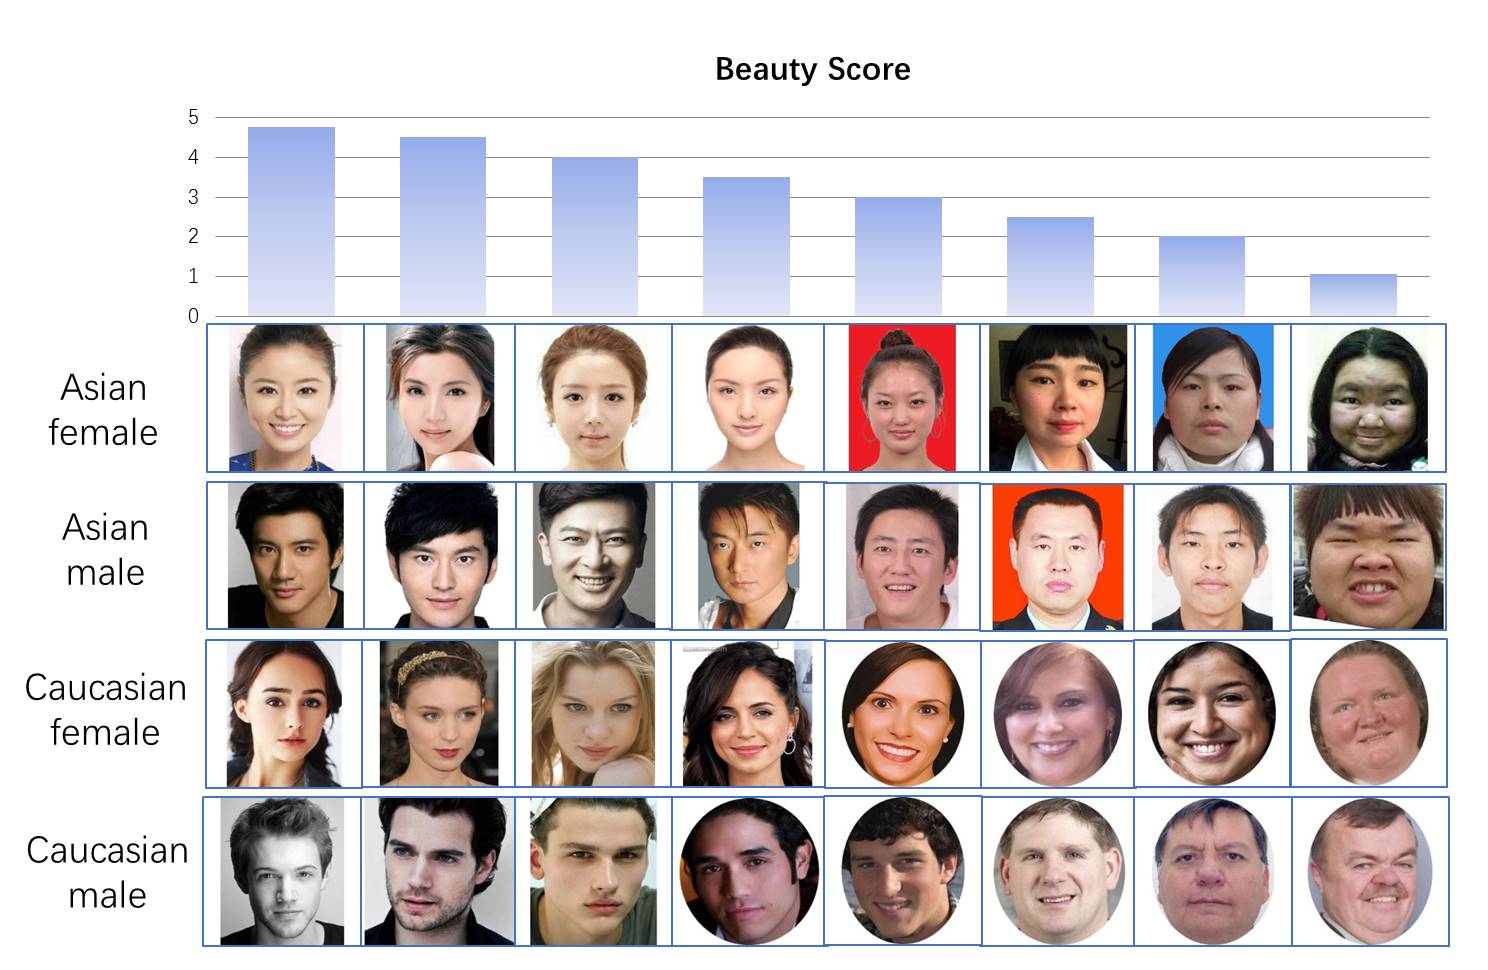
Các ảnh được gán nhãn với điểm số sắc đẹp khác nhau theo thang điểm từ 1 đến 5 bởi 60 tình nguyện viên.
Các bạn có thể xem thêm chi tiết trong bài báo SCUT-FBP: A Benchmark Datasetfor Facial Beauty Perception
Tập huấn luyện và thử nghiệm
Sử dụng 2 cách chia dữ liệu khác nhau để đánh giá mô hình
- 5-folds cross validation. Mỗi fold được chia theo tỷ lệ 80% mẫu (4400 ảnh) huấn luyện và 20% mẫu (1100 ảnh) cho việc thử nghiệm.
- Chia tập dữ liệu theo tỷ lệ 60% mẫu (3300 ảnh) huấn luyện và 40% mẫu (2200 ảnh) cho việc thử nghiệm.
Đánh giá mô hình
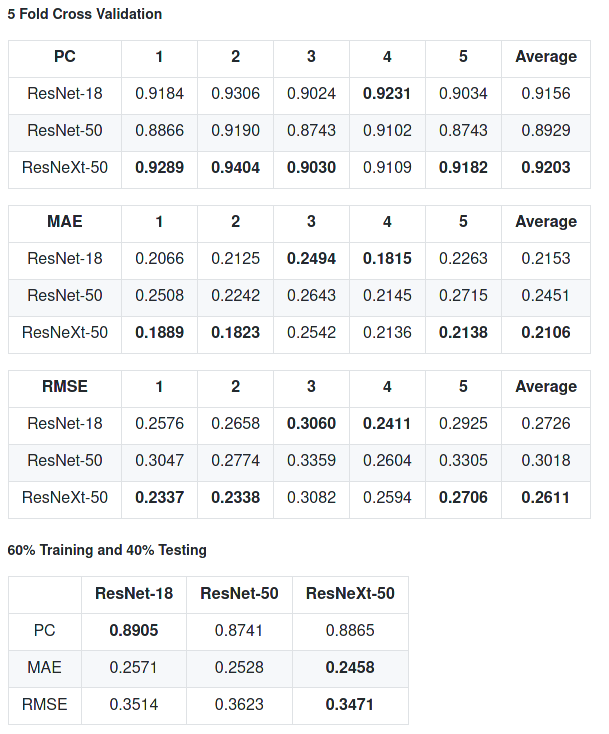
Etrain sử dụng 3 mô hình khác nhau trong torchvision.models là ResNet-18, ResNet-50, ResNeXt-50 và cũng đánh giá mô hình theo 3 chỉ số: PC, MAE, và RMSE.
Huấn luyện mô hình đánh giá
Cài đặt
Các bạn vào google colab để tạo notebook Google Colab. Tải repo và cài đặt các gói cần thiết
%cd /content
!git clone https://github.com/etrain-xyz/facial-beauty-prediction.git
%cd /content/facial-beauty-prediction
!pip install -r requirements.txt
Tải bộ dữ liệu SCUT-FBP5500 và giải nén.
!pip install gdown
!gdown https://drive.google.com/uc?id=1w0TorBfTIqbquQVd6k3h_77ypnrvfGwf
!unzip -q 'SCUT-FBP5500_v2.1.zip'


Trong bài viết này Etrain sẽ train dữ liệu với resnet18, bạn có thể tìm hiểu thêm ở file model.py.
#config.py
import torch
import torchvision.transforms as transforms


model_arch = 'resnet18'
epochs = 50

if torch.cuda.is_available():
    device = 'cuda:0'
else:
    device = 'cpu'

transform = transforms.Compose([
			transforms.Resize(256),
			transforms.CenterCrop(224),
			transforms.ToTensor(),
			transforms.Normalize(mean=[0.485, 0.456, 0.406], std=[0.229, 0.224, 0.225]),])

data_root = './SCUT-FBP5500_v2'

models_dir = './models'
Huấn luyện
Sử dụng bộ dữ liệu 60% huấn luyện và 40% thử nghiệm
#train.py
...
if __name__ == '__main__':
	# The split of 60% training and 40% testing
	train_dir = os.path.join(config.data_root, 'train_test_files/split_of_60%training and 40%testing/train.txt')
	val_dir = os.path.join(config.data_root, 'train_test_files/split_of_60%training and 40%testing/test.txt')
	saved_path = os.path.join(config.models_dir, config.model_arch+'_best_state.pt')
	train(train_dir, val_dir, model_saved_path=saved_path)
Huấn luyện dữ liệu
!mkdir /content/facial-beauty-prediction/models
!python train.py
Thử nghiệm
Tải 5_face_landmarks của thư viện dlib
%cd /content/facial-beauty-prediction/models
!wget http://dlib.net/files/shape_predictor_5_face_landmarks.dat.bz2
!bzip2 -d shape_predictor_5_face_landmarks.dat.bz2
Chạy thử nghiệm
%cd /content/facial-beauty-prediction/
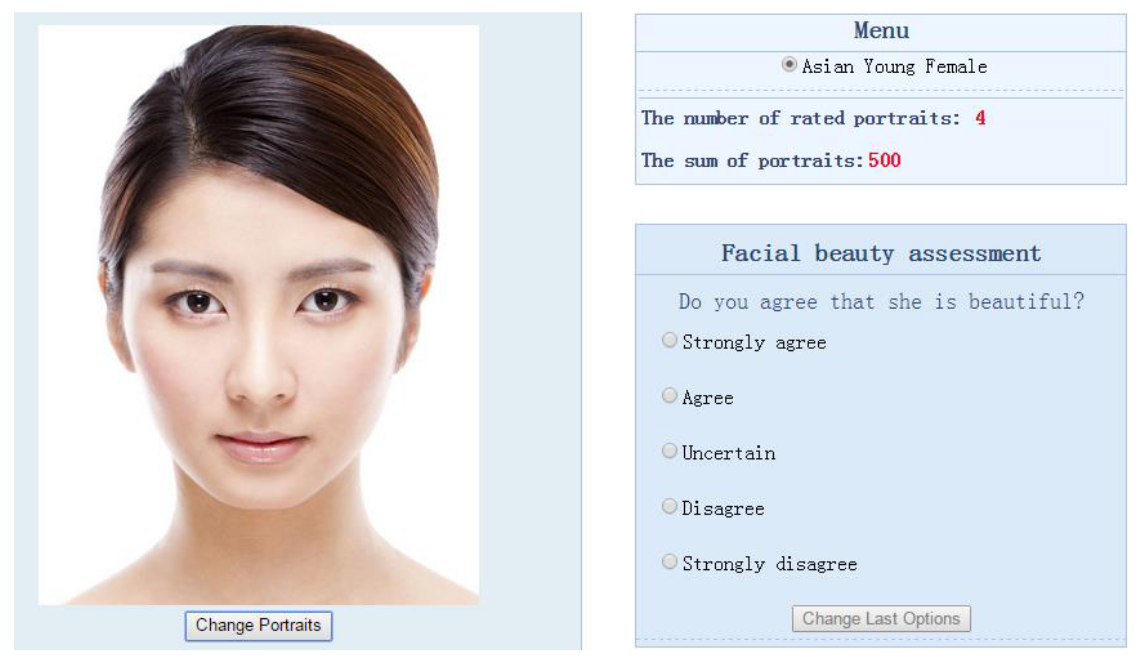
!python predict.py -i ./SCUT-FBP5500_v2/Images/AF883.jpg -m ./models/resnet18_best_state.pt
Xem kết quả một số hình ảnh
import glob
import matplotlib.pyplot as plt
import matplotlib.image as mpimg
%matplotlib inline

images = []
for img_path in glob.glob('./SCUT-FBP5500_v2/Images/result_*'):
    images.append(mpimg.imread(img_path))

plt.figure(figsize=(20,10))
columns = 5
for i, image in enumerate(images):
    plt.subplot(len(images) / columns + 1, columns, i + 1)
    plt.imshow(image)

Nguồn tham khảo
Xem nguồn tham khảo trong repo facial-beauty-prediction